Posts

Showing posts from November, 2017

How to create and handle Radio Button with button click

Image
   Step01: First Create MainActivity.xml following this.  Step02: First Create MainActivity.Java following this. package com.example.rupom.radiobuttondemo; import android.support.v7.app.AppCompatActivity; import android.os.Bundle; import android.view.View; import android.widget.Button; import android.widget.RadioButton; import android.widget.RadioGroup; import android.widget.TextView; public class MainActivity extends AppCompatActivity { private Button SubmitButton; private RadioGroup RadioGroup1; private TextView TextView1; private RadioButton GenderButton; @Override protected void onCreate(Bundle savedInstanceState) { super.onCreate(savedInstanceState); setContentView(R.layout.activity_main); SubmitButton= (Button) findViewById(R.id.SubmitButtonID); RadioGroup1 =(RadioGroup) findViewById(R.id.RadioGroupID); TextView1=(TextView) findViewById(...

How to create and handle checkbox with button click

Image
Step 01: Follow the following code for  AndroidMain.xml.  Step 01: Follow the following code for  AndroidMain.java   import android.support.v7.app.AppCompatActivity; import android.os.Bundle; import android.view.View; import android.widget.Button; import android.widget.CheckBox; import android.widget.TextView; import android.widget.Toast; import java.security.PrivilegedExceptionAction; public class MainActivity extends AppCompatActivity { private CheckBox MilkCheckBox,RiceCheckBox,SugarCheckBox; private Button GetButton; private TextView ResultText; public MainActivity() { } @Override protected void onCreate(Bundle savedInstanceState) { super.onCreate(savedInstanceState); setContentView(R.layout.activity_main); MilkCheckBox = (CheckBox) findViewById(R.id.checkBox1); RiceCheckBox = (CheckBox) findViewById(R.id.checkBox2); ...

How to set OnClickListener With implements method in android studio

Image
  Step 01: Create two button among the ActivityMain.xml as below. Step 02: Write Some code Among ActivityMain.java as below import android.support.v7.app.AppCompatActivity; import android.os.Bundle; import android.view.View; import android.widget.Button; import android.widget.Toast; public class MainActivity extends AppCompatActivity implements View.OnClickListener { private Button btn1,btn2; @Override protected void onCreate(Bundle savedInstanceState) { super.onCreate(savedInstanceState); setContentView(R.layout.activity_main); btn1= (Button) findViewById(R.id.button1); btn2= (Button) findViewById(R.id.button2); btn1.setOnClickListener(this); btn2.setOnClickListener(this); } @Override public void onClick(View v) { if(v.getId()==R.id.button1) { Toast.makeText(MainActivity.this,"I am Rupom",Toast.LENGTH_LONG).show(); } else if (v.getId()==R.id.button2) { To...

Solving try-catch Adding And Subtracting Calcuator Project Android Studio

Image
  try{ //Your Logic's Here } catch (Exception e){ Toast.makeText (MainActivity.this, "Please Enter Number First", Toast.LENGTH_LONG).show(); } package com.example.rupom.addsub; import android.content.Intent; import android.support.v7.app.AppCompatActivity; import android.os.Bundle; import android.view.View; import android.widget.Button; import android.widget.EditText; import android.widget.TextView; import android.widget.Toast; public class MainActivity extends AppCompatActivity { private Button addButton, subButton; private EditText Text1, Text2; private TextView result; @Override protected void onCreate(Bundle savedInstanceState) { super.onCreate(savedInstanceState); setContentView(R.layout.activity_main); addButton = (Button) findViewById(R.id.add); subButton = (Button) findViewById(R.id.sub); Text1 = (EditText) findViewById(R.id.editText1); Text2 = (EditText) findViewById(R....

Simple Adding And Subtracting Calcuator Project Android Studio

Image
Step01: Look At the Android MainActivity.java package com.example.rupom.addsub; import android.content.Intent; import android.support.v7.app.AppCompatActivity; import android.os.Bundle; import android.view.View; import android.widget.Button; import android.widget.EditText; import android.widget.TextView; public class MainActivity extends AppCompatActivity { private Button addButton,subButton; private EditText Text1,Text2; private TextView result; @Override protected void onCreate(Bundle savedInstanceState) { super.onCreate(savedInstanceState); setContentView(R.layout.activity_main); addButton= (Button) findViewById(R.id.add); subButton = (Button) findViewById(R.id.sub); Text1= (EditText) findViewById(R.id.editText1); Text2=(EditText) findViewById(R.id.editText2); result= (TextView) findViewById(R.id.resultShow); addButton.setOnClickListener(new View.OnClickListener() {...

How to create a custom toast message from button click in android studio.

Image
Toast messages are a quick way of telling the user something. They are short pop-up messages that show for a second or two and then fade away. Here's a basic Toast . It pops up near the bottom of the screen. A toast provides simple feedback about an operation in a small popup. It only fills the amount of space required for the message and the current activity remains visible and interactive. Toasts automatically disappear after a timeout. Code For toast is very simple-  public void onClick(View arg0) { Toast.makeText(getApplicationContext(), "Button is clicked" , Toast.LENGTH_LONG).show(); }   package com.example.rupom.hscictnotebook; import android.app.Activity; import android.support.v4.widget.ScrollerCompat; import android.support.v7.app.AppCompatActivity; import android.os.Bundle; import android.view.View; import android.widget.Button; import android.widget.Toast; public class MainActivity extends AppCompatActivity { Button yourButton; ...

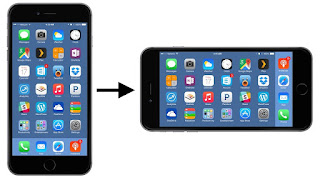
How to set or How to fixed Android Screen Orientation Android Studio Tutorial

Image
How to change android screen orientation in your app building is a common question for android entry level developer.  There are nine types of android screen Orientation. Each orientation works with default, sensor and user mode. And only one mode which is unspecified in properties. If you don't use any android screen orientation properties then it will works as unspecified by default. In order learn how to change android app screen orientation then follow the following steps.  (a) android :screenOrientation= "portrait" (b) android :screenOrientation= "landscape" (c) android :screenOrientation= "reversePortrait" (d) android :screenOrientation= "sensorPortrait" (e) android :screenOrientation= "userPortrait" (f)  android :screenOrientation= " reverse landscape" (g)  android :screenOrientation= "user landscape " (h) android :screenOrientation= "unspecified" (i)  android :screenOrientation= ...

How to set webview among Android Activity in Android Studio

Image
Step 01: Set a webview element on your Activity_main.Java as below. package com.example.rupom.bdboardresult; import android.support.v7.app.AppCompatActivity; import android.os.Bundle; import android.webkit.WebSettings; import android.webkit.WebView; import android.webkit.WebViewClient; public class MainActivity extends AppCompatActivity { WebView myBrowser; @Override protected void onCreate(Bundle savedInstanceState) { super.onCreate(savedInstanceState); setContentView(R.layout.activity_main); myBrowser = (WebView) findViewById(R.id.mybrowser); WebSettings webSettings = myBrowser.getSettings(); webSettings.setJavaScriptEnabled(true); myBrowser.loadUrl("http://www.educationboardresults.gov.bd"); myBrowser.setWebViewClient(new WebViewClient()); } @Override public void onBackPressed() { if (myBrowser.canGoBack()) { myBrowser.goBack(); } else { sup...

How To Go Another Activity By Button Click Android Studio Tutorial

Image
Step1: Make first Activity Name MainActivity.java and Make also another named Main2Activity.java Step2 : Make a button at MainActivity.xml at first user interface with id "button" Step3: Write Some Codes among MainActivity.java as like as below btn1= (Button) findViewById(R.id.button); btn1.setOnClickListener(new View.OnClickListener() { @Override public void onClick(View view) { Intent i = new Intent(MainActivity.this,Main2Activity.class); startActivity(i); } });

Google Standard Color For Android Studio

Image
Color in Material Design is inspired by bold hues juxtaposed with muted environments, deep shadows, and bright highlights. This color palette comprises primary and accent colors that can be used for illustration or to develop your brand colors. They’ve been designed to work harmoniously with each other. The color palette starts with primary colors and fills in the spectrum to create a complete and usable palette for Android, Web, and iOS. Google suggests using the 500 colors as the primary colors in your app and the other colors as accents colors. Themes enable consistent app styling through surface shades, shadow depth, and ink opacity.  Color range: 500 Color Code: #F44336 Color range: 50 Color Code: #FFEBEE

How to write bangla language in Android Studio

Image
Building Bangla Supported Android Application in Android Studio is possible by using custom typeface. Just Do the following steps that i described Step1 : Go To Android Project main and make a new Directory named "assets" Step2: Now Again make another new directory among assets file named "fonts" Step3: Now Download Kalpurush font  from here as .ttf file format. Step4: Copy And Paste this Bangla font to your fonts directory in android studio. Step5: Write some code at your ActivityMain.Java   Button btn; @Override protected void onCreate(Bundle savedInstanceState) { super.onCreate(savedInstanceState); setContentView(R.layout.activity_main); btn= (Button) findViewById(R.id.button); Typeface myCoustomFont=Typeface.createFromAsset(getAssets(),"fonts/kalpurush.ttf"); btn.setTypeface(myCoustomFont); Step6: ActivityMain.xml will looks like