Posts

Showing posts with the label MaterialDesign

Andorid Circular button with ripple effect android-circlebutton

Image
                                      https://github.com/markushi/android-circlebutton                                             FOLLOW THE ANDROID LIBRARY

Andorid Circular button with ripple effect Cuboid-Circle-Button

Image
                        https://github.com/MuhammadArsalanChishti/Cuboid-Circle-Button                                                       FOLLOW THE LIBRARY LINK

How To Make A Circuler Progress Bar | Android Default Ciruler Progresss Bar

Image
Step 01: Make A Circuler Android Default Progress Bar Step02:Make A New Thread follow MainActivity.Java public class MainActivity extends AppCompatActivity { ProgressBar progressBar; int prossess; @Override protected void onCreate(Bundle savedInstanceState) { super.onCreate(savedInstanceState); setContentView(R.layout.activity_main); progressBar=(ProgressBar) findViewById(R.id.progressBRid); Thread thread=new Thread(new Runnable() { @Override public void run() { doWork(); } }); thread.start(); } public void doWork() { for(prossess=20; prossess

Bottom Navigation View | Bottom Menu Bar | Bottom Bar Menu | Bottom Navigation Bar

Image
Step01:First Import compile'com.android.support:design:26.1.0' And Rebuild The App Step02: Make Some Menu Item accroding to menu.xml Step 3: Make A BottomNavigationView On MainActivity.xml Step 04: Write Some Java codes.. also setOnNavigationItemSelectedListener according to MainActivity.JAVA public class MainActivity extends AppCompatActivity { private BottomNavigationView bottomBar; @Override protected void onCreate(Bundle savedInstanceState) { super.onCreate(savedInstanceState); setContentView(R.layout.activity_main); bottomBar= (BottomNavigationView) findViewById(R.id.bottomBarID); bottomBar.setOnNavigationItemSelectedListener(new BottomNavigationView.OnNavigationItemSelectedListener() { @Override public boolean onNavigationItemSelected(@NonNull MenuItem item) { if(item.getItemId()==R.id.sendID) { ...

Store Color Setting | Store Theme Setting | Storing User Data By SharedPreferences

Image
Step 01: Make A Menu.xml  Step 02: Make A LinearLayout For Test The Changing Of Color MainActivity.xml Step 03 : Now Follow The JAVA Codes MainActivity.JAVA public class MainActivity extends AppCompatActivity { private LinearLayout linearLayout; @Override protected void onCreate(Bundle savedInstanceState) { super.onCreate(savedInstanceState); setContentView(R.layout.activity_main); linearLayout=(LinearLayout) findViewById(R.id.line1); if(loadColor()!=getResources().getColor(R.color.colorPrimary)) { linearLayout.setBackgroundColor(loadColor()); } } @Override public boolean onCreateOptionsMenu(Menu menu) { MenuInflater menuInflater=getMenuInflater(); menuInflater.inflate(R.menu.menu_layout,menu); return super.onCreateOptionsMenu(menu); } @Override public boolean onOptionsItemSelected(MenuItem item) { if(...

How To Make Android Tab Layout | change activity with left-right swipe | swipe screen

Image

How To Set Action Bar Logo | App Logo in Action Bar |

Image
public class MainActivity extends AppCompatActivity { @Override protected void onCreate(Bundle savedInstanceState) { super.onCreate(savedInstanceState); setContentView(R.layout.activity_main); getSupportActionBar().setDisplayShowHomeEnabled(true); getSupportActionBar().setLogo(R.drawable.ic_launcher_background); getSupportActionBar().setDisplayUseLogoEnabled(true); } }

How To Make A Share Menu Item On Action Bar

Image
In order to add a share menu on action bar. First you needs to make a menu item, that i was showed in the previous post. Now according to previous post add this mymenu.xml file on your main java by below codes. Now you needs to make  onOptionsItemSelected method according to following code and handle the share option menu by using  Intent intent= new Intent(Intent. ACTION_SEND ); intent.setType( "text/plain" ); startActivity(Intent. createChooser (intent, "Share With" )); @Override public boolean onCreateOptionsMenu(Menu menu) { MenuInflater menuInflater=getMenuInflater(); menuInflater.inflate(R.menu.mymenu,menu); return super.onCreateOptionsMenu(menu); } @Override public boolean onOptionsItemSelected(MenuItem item) { if(item.getItemId()==R.id.shareID) { Intent intent=new Intent(Intent.ACTION_SEND); intent.setType("text/plain"); startActivity(Intent.createCh...

How To Make Option Menu in Anddroid Studio | Making A Option Menu in Top Action Bar

Image
Step 01- Create A menu as mymenu.xml Step 01- Follow The Codes For MainActivity.Java public class MainActivity extends AppCompatActivity { @Override protected void onCreate(Bundle savedInstanceState) { super.onCreate(savedInstanceState); setContentView(R.layout.activity_main); } @Override public boolean onCreateOptionsMenu(Menu menu) { MenuInflater menuInflater=getMenuInflater(); menuInflater.inflate(R.menu.mymenu,menu); return super.onCreateOptionsMenu(menu); } @Override public boolean onOptionsItemSelected(MenuItem item) { if(item.getItemId()==R.id.SettingId) { Toast.makeText(getApplicationContext(),"Setting is selected", Toast.LENGTH_LONG).show(); } if(item.getItemId()==R.id.ShareId) { Toast.makeText(getApplicationContext(),"Share is selected", T...

How To Make Android Splash Screen With Horizontal Progress Bar

Step 01: Splash Screen Activity XML Step 02: Splash Screen Activity JAVA public class SplashActivity extends AppCompatActivity { int progress; private ProgressBar progressBar; @Override protected void onCreate(Bundle savedInstanceState) { super.onCreate(savedInstanceState); //Remove Tile Bar requestWindowFeature(Window.FEATURE_NO_TITLE); //Remove Window bar getWindow().setFlags(WindowManager.LayoutParams.FLAG_FULLSCREEN, WindowManager.LayoutParams.FLAG_FULLSCREEN ); setContentView(R.layout.activity_splash); progressBar= (ProgressBar) findViewById(R.id.progressBarId); Thread thread=new Thread(new Runnable() { @Override public void run() { doWork(); startApp(); } }); thread.start(); } public void doWork() { for(progress=20;progress Step 03: Mai...

How To Make Android Progress Bar Action in Android Studio

Image
Step-01: First Make Progress Bar On Android MainActivity.XML Like Following.. Step-02: Now Write Some Java Code At MainActivity.Java public class MainActivity extends AppCompatActivity { int progress; private ProgressBar progressBar; @Override protected void onCreate(Bundle savedInstanceState) { super.onCreate(savedInstanceState); setContentView(R.layout.activity_main); progressBar= (ProgressBar) findViewById(R.id.progressBarId); Thread thread=new Thread(new Runnable() { @Override public void run() { doWork(); } }); thread.start(); } public void doWork() { for(progress=20;progress

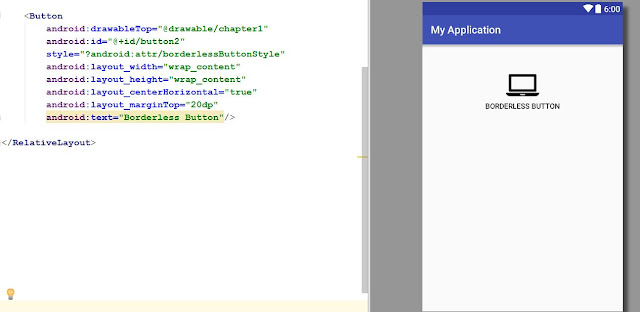
Android BorderLess Button Or Android Flat Button XML

Image

Android Sound Effect On Button Click | Button Click Sound in Android Studio

Step 01: Make Flat Button Follow The Below MainActivity.XML Step 01: Write Some Code For Make Sound Effect Button OnClick private Button btn; @Override protected void onCreate(Bundle savedInstanceState) { super.onCreate(savedInstanceState); setContentView(R.layout.activity_main); btn= (Button) findViewById(R.id.button2); final MediaPlayer mp = MediaPlayer.create(this,R.raw.oun); btn.setOnClickListener(new View.OnClickListener() { @Override public void onClick(View v) { mp.start(); } });

How To Make Total Full Screen Like Splash Screen Android Studio

Image
Follow The Below Java Codes for MainActivity.xml public class MainActivity extends AppCompatActivity { @Override protected void onCreate(Bundle savedInstanceState) { super.onCreate(savedInstanceState); //Remove Tile Bar requestWindowFeature(Window.FEATURE_NO_TITLE); //Remove Window bar getWindow().setFlags(WindowManager.LayoutParams.FLAG_FULLSCREEN, WindowManager.LayoutParams.FLAG_FULLSCREEN ); setContentView(R.layout.activity_main); } } Go To the Style.xml among the resource file and add NoActionBar Attribute Like this.

5 Button Layout Using Layout_weight and weightsum properties Android Responisve

Image

3 Equal Layout Using Layout_weight and weightsum properties Android Responisve Design

Image
Follow The Below XML Codes Using layout_weight and weightSum Properties.  weightSum or layout_weight properties is very essential for responsive android apps design.

How to create Zoom Control with an image

Image
Step 01: Make A Zoom Control With Image View MainActivity.xml Step 02: Write Some Java Code For Zoom Control MainActivity.Java   public class MainActivity extends AppCompatActivity { private ImageView imageView; private ZoomControls zoomControls; @Override protected void onCreate(Bundle savedInstanceState) { super.onCreate(savedInstanceState); setContentView(R.layout.activity_main); imageView= (ImageView) findViewById(R.id.ImageViewId); zoomControls = (ZoomControls) findViewById(R.id.ZoomControlId); zoomControls.setOnZoomInClickListener(new View.OnClickListener() { @Override public void onClick(View v) { float x= imageView.getScaleX(); float y=imageView.getScaleY(); imageView.setScaleX((float)x+1); imageView.setScaleY((float)y+1); } }); zoomControls.setOnZoo...

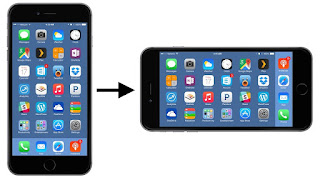
How to set or How to fixed Android Screen Orientation Android Studio Tutorial

Image
How to change android screen orientation in your app building is a common question for android entry level developer.  There are nine types of android screen Orientation. Each orientation works with default, sensor and user mode. And only one mode which is unspecified in properties. If you don't use any android screen orientation properties then it will works as unspecified by default. In order learn how to change android app screen orientation then follow the following steps.  (a) android :screenOrientation= "portrait" (b) android :screenOrientation= "landscape" (c) android :screenOrientation= "reversePortrait" (d) android :screenOrientation= "sensorPortrait" (e) android :screenOrientation= "userPortrait" (f)  android :screenOrientation= " reverse landscape" (g)  android :screenOrientation= "user landscape " (h) android :screenOrientation= "unspecified" (i)  android :screenOrientation= ...

Google Standard Color For Android Studio

Image
Color in Material Design is inspired by bold hues juxtaposed with muted environments, deep shadows, and bright highlights. This color palette comprises primary and accent colors that can be used for illustration or to develop your brand colors. They’ve been designed to work harmoniously with each other. The color palette starts with primary colors and fills in the spectrum to create a complete and usable palette for Android, Web, and iOS. Google suggests using the 500 colors as the primary colors in your app and the other colors as accents colors. Themes enable consistent app styling through surface shades, shadow depth, and ink opacity.  Color range: 500 Color Code: #F44336 Color range: 50 Color Code: #FFEBEE