Posts

Showing posts from December, 2017

Andorid Circular button with ripple effect android-circlebutton

Image
                                      https://github.com/markushi/android-circlebutton                                             FOLLOW THE ANDROID LIBRARY

Andorid Circular button with ripple effect Cuboid-Circle-Button

Image
                        https://github.com/MuhammadArsalanChishti/Cuboid-Circle-Button                                                       FOLLOW THE LIBRARY LINK

How To Make A Circuler Progress Bar | Android Default Ciruler Progresss Bar

Image
Step 01: Make A Circuler Android Default Progress Bar Step02:Make A New Thread follow MainActivity.Java public class MainActivity extends AppCompatActivity { ProgressBar progressBar; int prossess; @Override protected void onCreate(Bundle savedInstanceState) { super.onCreate(savedInstanceState); setContentView(R.layout.activity_main); progressBar=(ProgressBar) findViewById(R.id.progressBRid); Thread thread=new Thread(new Runnable() { @Override public void run() { doWork(); } }); thread.start(); } public void doWork() { for(prossess=20; prossess

Bottom Navigation View | Bottom Menu Bar | Bottom Bar Menu | Bottom Navigation Bar

Image
Step01:First Import compile'com.android.support:design:26.1.0' And Rebuild The App Step02: Make Some Menu Item accroding to menu.xml Step 3: Make A BottomNavigationView On MainActivity.xml Step 04: Write Some Java codes.. also setOnNavigationItemSelectedListener according to MainActivity.JAVA public class MainActivity extends AppCompatActivity { private BottomNavigationView bottomBar; @Override protected void onCreate(Bundle savedInstanceState) { super.onCreate(savedInstanceState); setContentView(R.layout.activity_main); bottomBar= (BottomNavigationView) findViewById(R.id.bottomBarID); bottomBar.setOnNavigationItemSelectedListener(new BottomNavigationView.OnNavigationItemSelectedListener() { @Override public boolean onNavigationItemSelected(@NonNull MenuItem item) { if(item.getItemId()==R.id.sendID) { ...

HSC ICT BOOK BANGLA

Image
This H.S.C class ICT app is according to the Bangladeshi XI-XII class syllabus. All six chapters of syllabus discussed here easily. Student of 2017 and 2018 even 2019 will be benefited from this app. This app is about the-  1. Introduction of ICT 2. Communication Systems  3. Number System 4. Digital Device 5. Program Design 6.C-Programming 7. Data Base Management System Download - HSC ICT BOOK BANGLA

Store Color Setting | Store Theme Setting | Storing User Data By SharedPreferences

Image
Step 01: Make A Menu.xml  Step 02: Make A LinearLayout For Test The Changing Of Color MainActivity.xml Step 03 : Now Follow The JAVA Codes MainActivity.JAVA public class MainActivity extends AppCompatActivity { private LinearLayout linearLayout; @Override protected void onCreate(Bundle savedInstanceState) { super.onCreate(savedInstanceState); setContentView(R.layout.activity_main); linearLayout=(LinearLayout) findViewById(R.id.line1); if(loadColor()!=getResources().getColor(R.color.colorPrimary)) { linearLayout.setBackgroundColor(loadColor()); } } @Override public boolean onCreateOptionsMenu(Menu menu) { MenuInflater menuInflater=getMenuInflater(); menuInflater.inflate(R.menu.menu_layout,menu); return super.onCreateOptionsMenu(menu); } @Override public boolean onOptionsItemSelected(MenuItem item) { if(...

Storing User Data By SharedPreferences | Android Data Base Tutorial 1 | Store String And Number | Storing User Details

Image
Step 01: Make A User Interface- Step 01:Write Some Codes Using SharedPreferences for storing android data and load it again public class MainActivity extends AppCompatActivity implements View.OnClickListener { private EditText usernameEditText,passwordEditText; private Button saveButton,loadButton; private TextView dataText; @Override protected void onCreate(Bundle savedInstanceState) { super.onCreate(savedInstanceState); setContentView(R.layout.activity_main); usernameEditText= (EditText) findViewById(R.id.userNameID); passwordEditText=(EditText) findViewById(R.id.PasswordID); saveButton= (Button) findViewById(R.id.saveID); loadButton= (Button) findViewById(R.id.loadID); dataText=(TextView)findViewById(R.id.dataID); saveButton.setOnClickListener(this); loadButton.setOnClickListener(this); ...

How To Make Android Tab Layout | change activity with left-right swipe | swipe screen

Image

How To Set Action Bar Logo | App Logo in Action Bar |

Image
public class MainActivity extends AppCompatActivity { @Override protected void onCreate(Bundle savedInstanceState) { super.onCreate(savedInstanceState); setContentView(R.layout.activity_main); getSupportActionBar().setDisplayShowHomeEnabled(true); getSupportActionBar().setLogo(R.drawable.ic_launcher_background); getSupportActionBar().setDisplayUseLogoEnabled(true); } }

How To Make Navigation Drawer Using Default Navigation Drawer Activity

How To Make A Share Menu Item On Action Bar

Image
In order to add a share menu on action bar. First you needs to make a menu item, that i was showed in the previous post. Now according to previous post add this mymenu.xml file on your main java by below codes. Now you needs to make  onOptionsItemSelected method according to following code and handle the share option menu by using  Intent intent= new Intent(Intent. ACTION_SEND ); intent.setType( "text/plain" ); startActivity(Intent. createChooser (intent, "Share With" )); @Override public boolean onCreateOptionsMenu(Menu menu) { MenuInflater menuInflater=getMenuInflater(); menuInflater.inflate(R.menu.mymenu,menu); return super.onCreateOptionsMenu(menu); } @Override public boolean onOptionsItemSelected(MenuItem item) { if(item.getItemId()==R.id.shareID) { Intent intent=new Intent(Intent.ACTION_SEND); intent.setType("text/plain"); startActivity(Intent.createCh...

How To Make Option Menu in Anddroid Studio | Making A Option Menu in Top Action Bar

Image
Step 01- Create A menu as mymenu.xml Step 01- Follow The Codes For MainActivity.Java public class MainActivity extends AppCompatActivity { @Override protected void onCreate(Bundle savedInstanceState) { super.onCreate(savedInstanceState); setContentView(R.layout.activity_main); } @Override public boolean onCreateOptionsMenu(Menu menu) { MenuInflater menuInflater=getMenuInflater(); menuInflater.inflate(R.menu.mymenu,menu); return super.onCreateOptionsMenu(menu); } @Override public boolean onOptionsItemSelected(MenuItem item) { if(item.getItemId()==R.id.SettingId) { Toast.makeText(getApplicationContext(),"Setting is selected", Toast.LENGTH_LONG).show(); } if(item.getItemId()==R.id.ShareId) { Toast.makeText(getApplicationContext(),"Share is selected", T...

How To Make Android Splash Screen With Horizontal Progress Bar

Step 01: Splash Screen Activity XML Step 02: Splash Screen Activity JAVA public class SplashActivity extends AppCompatActivity { int progress; private ProgressBar progressBar; @Override protected void onCreate(Bundle savedInstanceState) { super.onCreate(savedInstanceState); //Remove Tile Bar requestWindowFeature(Window.FEATURE_NO_TITLE); //Remove Window bar getWindow().setFlags(WindowManager.LayoutParams.FLAG_FULLSCREEN, WindowManager.LayoutParams.FLAG_FULLSCREEN ); setContentView(R.layout.activity_splash); progressBar= (ProgressBar) findViewById(R.id.progressBarId); Thread thread=new Thread(new Runnable() { @Override public void run() { doWork(); startApp(); } }); thread.start(); } public void doWork() { for(progress=20;progress Step 03: Mai...

How To Make Android Progress Bar Action in Android Studio

Image
Step-01: First Make Progress Bar On Android MainActivity.XML Like Following.. Step-02: Now Write Some Java Code At MainActivity.Java public class MainActivity extends AppCompatActivity { int progress; private ProgressBar progressBar; @Override protected void onCreate(Bundle savedInstanceState) { super.onCreate(savedInstanceState); setContentView(R.layout.activity_main); progressBar= (ProgressBar) findViewById(R.id.progressBarId); Thread thread=new Thread(new Runnable() { @Override public void run() { doWork(); } }); thread.start(); } public void doWork() { for(progress=20;progress

Android BorderLess Button Or Android Flat Button XML

Image

Android Sound Effect On Button Click | Button Click Sound in Android Studio

Step 01: Make Flat Button Follow The Below MainActivity.XML Step 01: Write Some Code For Make Sound Effect Button OnClick private Button btn; @Override protected void onCreate(Bundle savedInstanceState) { super.onCreate(savedInstanceState); setContentView(R.layout.activity_main); btn= (Button) findViewById(R.id.button2); final MediaPlayer mp = MediaPlayer.create(this,R.raw.oun); btn.setOnClickListener(new View.OnClickListener() { @Override public void onClick(View v) { mp.start(); } });

How To Make Total Full Screen Like Splash Screen Android Studio

Image
Follow The Below Java Codes for MainActivity.xml public class MainActivity extends AppCompatActivity { @Override protected void onCreate(Bundle savedInstanceState) { super.onCreate(savedInstanceState); //Remove Tile Bar requestWindowFeature(Window.FEATURE_NO_TITLE); //Remove Window bar getWindow().setFlags(WindowManager.LayoutParams.FLAG_FULLSCREEN, WindowManager.LayoutParams.FLAG_FULLSCREEN ); setContentView(R.layout.activity_main); } } Go To the Style.xml among the resource file and add NoActionBar Attribute Like this.

How to make a Alert Dialog Form Exit Button Click Android Studio

Image
Try To Understands the following java codes for Alert Dialog public class MainActivity extends AppCompatActivity implements View.OnClickListener { private Button exitbutton; private AlertDialog.Builder alertbuilder; @Override protected void onCreate(Bundle savedInstanceState) { super.onCreate(savedInstanceState); setContentView(R.layout.activity_main); exitbutton= (Button) findViewById(R.id.exitId); exitbutton.setOnClickListener(this); } @Override public void onClick(View v) { alertbuilder = new AlertDialog.Builder(MainActivity.this); //for setting Title alertbuilder.setTitle(R.string.title); //for setting Messsage alertbuilder.setMessage(R.string.message); //for Settting Icon alertbuilder.setIcon(R.drawable.sign); alertbuilder.setCancelable(false); alertbuilder.setPositiveButton("YES", new DialogInterface.OnClickL...

5 Button Layout Using Layout_weight and weightsum properties Android Responisve

Image

3 Equal Layout Using Layout_weight and weightsum properties Android Responisve Design

Image
Follow The Below XML Codes Using layout_weight and weightSum Properties.  weightSum or layout_weight properties is very essential for responsive android apps design.

How to create Zoom Control with an image

Image
Step 01: Make A Zoom Control With Image View MainActivity.xml Step 02: Write Some Java Code For Zoom Control MainActivity.Java   public class MainActivity extends AppCompatActivity { private ImageView imageView; private ZoomControls zoomControls; @Override protected void onCreate(Bundle savedInstanceState) { super.onCreate(savedInstanceState); setContentView(R.layout.activity_main); imageView= (ImageView) findViewById(R.id.ImageViewId); zoomControls = (ZoomControls) findViewById(R.id.ZoomControlId); zoomControls.setOnZoomInClickListener(new View.OnClickListener() { @Override public void onClick(View v) { float x= imageView.getScaleX(); float y=imageView.getScaleY(); imageView.setScaleX((float)x+1); imageView.setScaleY((float)y+1); } }); zoomControls.setOnZoo...

How to create Switch with SSwitch Control with setOnCheckedChangeListener

Image
Step-01:Create a Switch First.. Step-02: Write Some Java Code And Set OnCheckedChangeListener for switch MainActivity.Java public class MainActivity extends AppCompatActivity { private Switch aSwitch; @Override protected void onCreate(Bundle savedInstanceState) { super.onCreate(savedInstanceState); setContentView(R.layout.activity_main); aSwitch= (Switch) findViewById(R.id.switchId); aSwitch.setOnCheckedChangeListener(new CompoundButton.OnCheckedChangeListener() { @Override public void onCheckedChanged(CompoundButton buttonView, boolean isChecked) { if(isChecked) { Toast.makeText(getApplicationContext(),"ON", Toast.LENGTH_SHORT).show(); } else { Toast.makeText(getApplicationContext(),"OFF", Toast.LENGTH_SHORT).show(); } } ...

How to create SeekBar with SeekBar Control with setOnSeekBarChangeListener

Image
Step-01: Make Seek Bar according to the MainActivity.xml Step-02: Make Seek Bar according to the MainActivity.JAVA public class MainActivity extends AppCompatActivity { private SeekBar seekBar; private TextView textView; @Override protected void onCreate(Bundle savedInstanceState) { super.onCreate(savedInstanceState); setContentView(R.layout.activity_main); seekBar= (SeekBar) findViewById(R.id.SeekBarID); textView = (TextView) findViewById(R.id.TextViewID); textView.setText("Volume: "+seekBar.getProgress()+"/"+seekBar.getMax() ); seekBar.setOnSeekBarChangeListener(new SeekBar.OnSeekBarChangeListener() { @Override public void onProgressChanged(SeekBar seekBar, int progress, boolean fromUser) { textView.setText("Volume: "+progress+"/"+seekBar.getMax() ); } @Override public void onStartTrackingTouch(SeekBar seekBar) ...

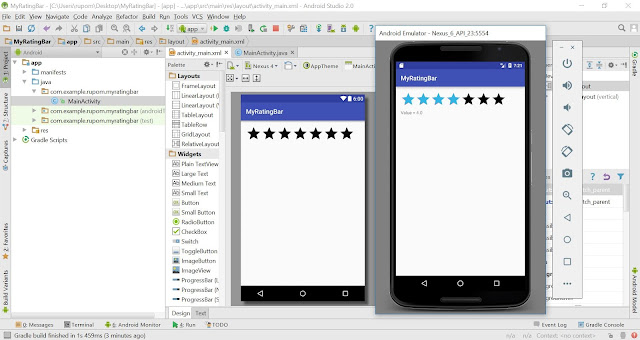
How To Create Rating Bar And setOnRatingBarChangeListener in android studio

Image
Step01: First Create RatingBar With Required RatingBar Properties MainActivity.xml Step01: Follow Java Code and setOnRatingBarChangeListener MainActivity.Java public class MainActivity extends AppCompatActivity { private RatingBar ratingBar; private TextView textView; @Override protected void onCreate(Bundle savedInstanceState) { super.onCreate(savedInstanceState); setContentView(R.layout.activity_main); ratingBar = (RatingBar) findViewById(R.id.ratingBarId); textView = (TextView) findViewById(R.id.textViewId); ratingBar.setOnRatingBarChangeListener(new RatingBar.OnRatingBarChangeListener() { @Override public void onRatingChanged(RatingBar ratingBar, float rating, boolean fromUser) { textView.setText("Value = "+rating); } }); } }